blog header

blog header

Monday, 30 September 2019

Bob-a-job month


September has been "Paint A Bob" month on the Oldhammer Community Facebook page, or, as I like to call it "Bob-A-Job Month" (non-UK followers, this was a term used by Boy Scouts who used to have a "bob-a-job week" where they would do odd jobs for people and be paid £1 (1 bob) per job. I think inflation may have changed that now!). This is the second in a series of contests painting a model by a particular sculptor and then having the competition judged by the sculptor in question. The last one was "Make a Trish", this time it was the turn of Mr Bob Olley, undoubtedly the Marmite of the miniature sculpting world!
 
Look at this meanie, he's gonna mess you up.
 
 
It's hard not to spot a Bob Olley sculpt; the big head, the wealth of texture, the deviation from 'canon'... Bob certainly produces some unique creations.  I will confess I was not a fan of them, until I painted one. I have a general rule for what qualifies a good sculpt, one which I try to go by when pushing putty. That is: if you can't produce a decent tabletop-level result with a combination of base coat, wash and drybrush it is not a good gaming model. Anything with too many flat surfaces that requires expert-level blending and freehand work is fine for those painting at display level, but unless you are a master it will look terrible on the table.
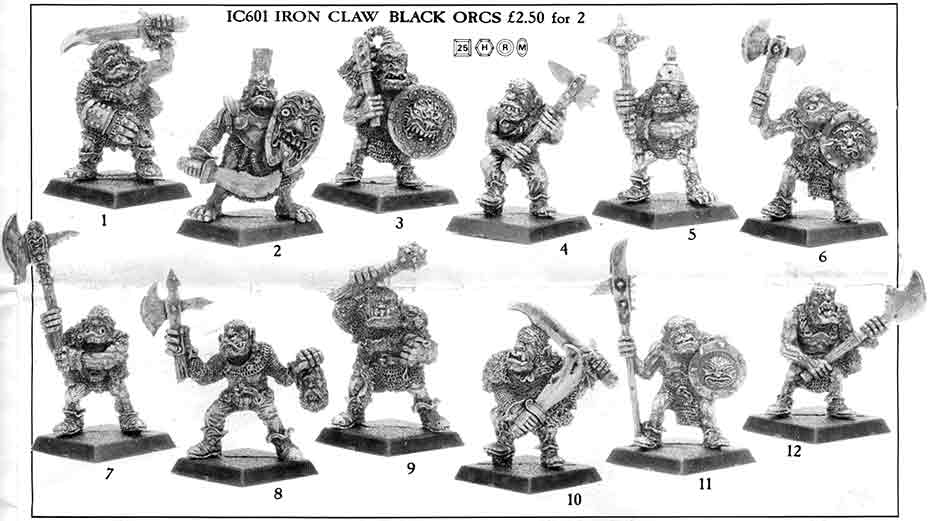
 
Bob's black orcs. I used to have a couple of these guys but I didn't like them and gave them away. What a fool I was!
 
 
Start painting a Bob and it will be clear he has a similar policy.
These are perfect sculpts for the pre-airbrush era where artists' inks are king. Put a drop of ink on a Bob Olley sculpt and all manner of strange and wonderful details will start to appear. Stuff you'd never notice from a catalogue page or bare metal miniatures is suddenly brought to vivid life. Put simply, to an average painter Bob Olley sculpts are pure gold, they'll make you look like a master with so little effort! I'm sure an amazing painter would bring our further magic from all those intricate bits.
 
Olley's Armies Scrunts- the biggest dwarves you will ever own!
 
 
A couple of years back I picked up a bunch of Essex undead cavalry for Bob's superb horses (that's another thing Bob does brilliantly- animals. Just look at his wonderful ork kangaroo!). Unfortunately the skeletons are one of the things I still can't bring myself to love, their big heads just don't fit with anything else I have in my undead army, but the horses are magic (and I'm pleased to see they now sell them separately). At the same time I picked up some gnarled old wizards and my first Bob-a-job entry is one of these.
 
 
His robe made me think Plains Indian so I've tried to up the shamanic elements as he summons his snakey servants. As someone who is petrified of snakes I was grateful for Bob's cartoony take on the blighters. I have a Tim Prow snakemen on my shelf which still makes me shudder if I forget it's there and catch sight of it. Just look at the expression in the face, the fierce eyebrows, the flared nostrils, the bad teeth! None of that is me, that is all Bob.
 
Because of the classic look of the mini and theme I decided to try and emulate a 'Heroes for Wargames' kinda look to the photo. Nice soft focus (not entirely deliberate).


My second entry is a more recent sculpt. A Bob Olley ogre from Ral Partha Europe. I picked up a dozen of these ogres a few years ago (see blog post) and really wanted this shaman to go with them. Unfortunately I had not recorded what paints and inks I used to do the tartan robes, so had to guess. I now keep records of the pallet used in any group I might want to add to later on! Fortunately I think I guessed right, or close enough that he works nicely with them.

So if you're a fan of a Bob sculpt I hope you enjoy these efforts. And if you aren't a fan of Marmite, um, Bob, perhaps try painting one? They're dead cheap from Essex and RPE. You might find you like it, or you might find you don't.

Share/Bookmark

Thursday, 5 September 2019

Intrigue in the courts of Annwyn


The next kickstarter for The Woods is rolling out next week. I managed to splash some paint around on holiday and now have all the initial figures done.


The idea was to take the venetian/renaissance aesthetic I'd set for the fae and use it to put out some figures that would have other uses in other places. I was fortunate enough to be able to pick up some lady pirates from Charlie Earl which have formed the bulk of the nobles (with addition of masks, variant poses and assembling them into single-piece castings). The fae martial I scaled to fit in with 4th ed Empire halberdiers which I'm told are curiously hard to come by. I'll almost certainly be getting a unit of them cast up for a certain birthday game.


The donkey-headed Hobyah (a-la Puck from midsummer Night's Dream) are dual-purpose. I've sculpted some axe heads which may supplied as separate pieces to make single or double-headed axes for them. In this form though they make up the bearers for a faerie palanquin which I'm hoping to get some paint on over the weekend.
Also in the sculpted but not cast pile are three faerie commanders which can either be mounted or on foot. The horses have been built onto the old sidhe horse that featured in the first Oakbound kickstarter. I'm toying with whether to have the commanders' torsos separate so they can be glued to standing or riding legs or whether to make up a full standing and riding figure for each option. I think probably the second, nobody likes having spare legs lying around.
 
 
There should be an article in the October Miniature Wargames magazine (out 13th September) discussing the use of fae in The Woods, with a scenario and look at the miniatures in the kickstarter.
 For anyone interested the kickstarter is going to officially launch on Saturday 14th after earlybird pledges open on Friday 13th. There's only one pledge level and essentially everything is an add-on so you can make up whatever combo you like. Earlybirds get you an extra 10% free to spend on miniatures. The campaign will run until Sunday 29th.


Share/Bookmark

Friday, 23 August 2019

Elder Eldar Harlequins

Harlequins have been on my to-do list for years, specifically mixing some 'actual' harlequins and some 'normal' elder into a force for playing Space Crusade with the Eldar Attack expansion. A couple of months back I was really pumped to get them on the painting table but with BOYL looming I put them off. Now that the big day is past for another year I have room to get them out.

They aren't actually the first things I've been working on post-BOYL, I have made a start of my Halfling contingent which has some great models old and new and which I'll be getting some photos of very soon. In fact I have been motivated to finally get started on the harlies as I'll be painting fae for The Woods in the next few weeks and want to try out some colour schemes for them which will probably be very similar.

The look I wanted for them is traditional Commedia mixed with Venetian masquerade. Cream, black and gold are dominant in both so I decided to go for a bone scheme over which the idea is to lay washes and inks.


Here you can see the array of test models I've been practicing on. All models are getting a grey primer base, washed with a blend of Army Painter Dark Tone, Citadel Black Ink and Glaze Medium. Then all areas of plate and fabric are getting a coat of Foundry Boneyard B, highlighted with Boneyard C and then White. Now, at this stage I was sorely tempted to stick with this scheme, especially on the guardian-type guys. It has a lovely stormtrooper look to it. If I ever expand this force into a small army for Rogue Trader I may do some support troops in flat bone armour.

I did a test harlequin and guardian to see how the different styles of outfit would take patterns. My inspiration was Mike McVey's High Avatar and I very much wanted to emulate that with less yellow. I'm quite happy with the way the harlie turned out, but there are a few things I'll do differently on future models. Nothing enough to make me want to strip and repaint this one, hopefully she'll blend in when the whole force is done. The diamonds on the leg I outlined first in black then inked in. This gives a neat border but makes the pattern look very dark. The traditional Commedia harlequin pattern has the diamonds surrounded by cream, preserving the light look. I'll give that a go on one of the others, it will mean I need to be much neater with the diamonds and maybe need to touch up the bone colour afterwards to sharpen up the shapes. The red on the glove has a very pink look, as it's red ink over a white base. I think for future red areas I'll need to apply an orange base before the ink to warm it up.


Here are a few more models taken forward. None of these are finished, I have to add the gold yet... more on that in a bit. The left guardian I was trialling diamonds surrounded by cream. They're not too scruffy, but they are much bigger than I'm hoping to do on fabric. The middle guy is based on a female harlequin costume, mostly black, cream and gold. I've introduced a bit of purple to try and tie it to the previous model, I'm hoping to use it as an accent to tie the squad together but am finding it tricky to place any in those parts of the guardians as they have chainmail. The right-hand guy is an experiment in using the triangular pattern found on many harlequin costumes. I have substituted blue for green to give a more Italian feel. I'm not totally sold on any of these guys, but they look ok together as a squad which is important.

Gold is going to be a major player, especially to give the masquerade look, but I'm undecided which to use. Normally I'd go for a Vallejo bright gold or bronze but I think I might try out one of the foundry golds for these. Usually I find them too weak to give a good coverage but here I want to just add a bit of shine whilst allowing the cream to come through so they may be just right. I'm not sure where to put the gold yet either. It should really be on their masks, but I also kinda like the hockey-mask look of the plain bone. I'm especially not sure on the first harlie I painted as it would remove even more of the bone. Maybe I should do some swirls on their weapons to indicate ornamentation? What do you think?
Share/Bookmark

Monday, 12 August 2019

The All-New Oakbound Studio! or Why I Haven't Been Blogging Much Of Late.

As I mentioned in my last post things have been rather busy for the last 6-8 months what with buying our first home and all the work that comes with it. Yesterday some of the chaps from Dursley's Epic Roleplayers/GROGG came over to play the first game in my new games room/studio so it has all been worth it. Not that the rest of the house is entirely finished of course, but the wife and I now have our studio spaces complete so to both our minds that's the important bits done!
 
 
It has felt like an epic journey and now I have my own space I am looking forward to being able to sculpt, paint, game, photograph, blog and maybe even get some videos shot with far more ease as I can leave things out without fear of irritating anyone. I tried to do a fairly comprehensive photo record of the quest for hobby space, so please excuse me whilst I photo dump.
 
 
The attic room as it was when we looked at the house just over a year ago...


...and when we got the keys in November.


 Playing with layouts and acquiring furniture.


With help from the upstanding gentleman Harry the cracked, wonky lath and plaster ceilings came down (in a shower of 20th century dust!) Many trips to the dump ensued...


Plenty of room up there for a loft space, now boarded and with access hatch. 

 
A spot of plaster needed around the window.


Finally the roofers arrive to remove the old, flaky slates and cut in the gaps for the velux windows. More light required! 
 

Felt goes on.


New windows in. At this point we were having so much trouble trying to get the roofers to come and do a day's work... you'd think they didn't want to be paid the ridiculous amount we ended up agreeing to!


Ready for plasterboarding.


A spot of DIY with my parents lending a few very capable hands. Wonky joists meant my careful measuring left a few gaps to fill, but nothing serious.
 

We found a very capable plasterer who got the studio rooms done nice and quickly. Unfortunately he then "had to rush off" to another job, leaving me with lots of sanding, filling, sanding, sanding and sanding to do on the landing ceiling, but at least the big rooms were done. He did a really nice job of curving the slope of the roof and blending into the walls. Not so nice around the skirting boards, light switches, radiators etc. so a bit more filling and sanding for me there.


Tradesmen off site we were able to crack on with the rest of the job at a much quicker rate. Once the dust had settled the carpets came up and out. The floorboards showed evidence of a few drips of paint from previous decorators but as these are both arty studios we didn't try to get it all off. After a couple of good scrubs the floor was sealed with hard wax oil.


Skirting boards stripped with a hot air gun and varnish remover, finished off with a hard wax oil. Tops of skirting boards neatened off with caulk and any significant gaps below them filled with expanding foam and floorboard sealer. Sadly our neighbours on one side smoke and the smell sometimes drifts through so I am in the process of trying to block as many cracks as possible!


Paint going on. I was having difficulty picking a green (I wanted green) and had several samples that were either too lurid or too dark. In the end we picked a colour we are calling "Nouvion Museum Green" as we picked it after watching an episode of 'Allo 'Allo and holding swatches up against the screen.


Furniture moves back in. Or, more accurately, moves in for the last time having shunted between the two studio rooms whilst we were decorating!


There are so many screws in that wall unit... I just didn't trust them to hold up the weight, the unit itself is super heavy never mind the amount of (precious) lead going on it! If I had room to put more screws in I would do so, but 16 seems to be enough to hold it so far. No sign of it (or the wall) shifting so far at least!


The alcove bookcase between the two studios, something we decided on very early in the process. 


A couple of gumtree bargain bar stools. Adjustable to suit the height of both my painting station and the high gaming table.


My action figures finally escape my parents' attic.


How can the unit be so nearly full already? 

 
The base units for gaming table (built from an old pine wardrobe, bookcase and chest of drawers) in place. It will double as a guest bed when we need one and handily fits the the airbed as well as being a decent size for wargames.
 

Mr Kiwi inspects the room from a new angle.

 
The top section of the gaming table which puts the boards at a height of 900mm, comfortable for me to work and game at. The sides flap down and the top is removable to give a lower height table for sit-down games or use as a bed.

 
My just-over-2' by just-under-1' modules sit side by side nicely. I have made a canvas to fit between the two cabinets which Sol is generously painting (one of a series of) backdrops onto for photography purposes. Eventually I hope the painting I commissioned from John Sibbick for the cover of The Woods will hang there too.
 

With the top section folded down ready for a spot of roleplay. The green cloth is a strip of 'fake grass' from Lidl.


Studio pretty much finished.

 
A final inspection from the boss. He didn't stay for the game, he preferred to hide under our bed!

 
Before and after.


Share/Bookmark

Fimm McCool's

Fimm McCool's