Waaaaaaay back in 2019 I did Salute for the first time (as a trader). I turned up with my provincial stand and did a roaring trade but was determined to have something a bit more impressive for the following year. I immediately purchased a much larger banner and reconfigured my tabletop cabinets with display space. Then Covid hit and Salute 2020 was postponed, postponed and postponed again. Now (despite soaring Covid ccases and 1000 deaths per week the media isn't talking about...) it looks like Salute 2020 will be going ahead in a few weeks' time. Of course in the intervening time my ranges have grown somewhat in size! As a result I need to completely review my layout, which I have been doing with the help of a little white card model- set design training coming in handy!

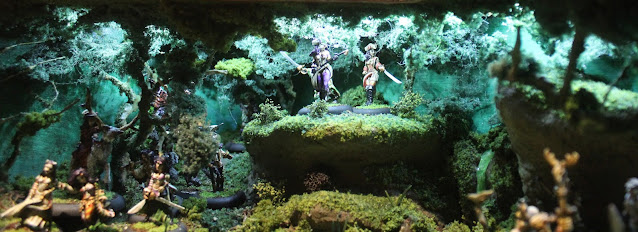
One thing I was keen to preserve was having a fully-terrained display. After polling supporters on Faceache I decided I wouldn't terrain every shelf of my cabinet (instead keeping plain, black shelves to show up the miniatures with no distractions) but to go with one landscaped diorama box that would help show the character/flavour of the world of The Woods. This box would sit between my low-level figure racking and the tabletop unit and give me some extra display space.
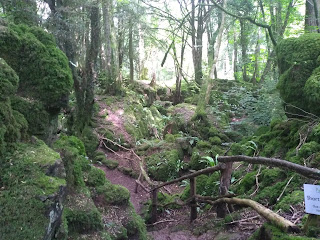
Earlier this year my wife and I revisited Puzzlewood in the Forest of Dean, a beautiful forest setting with the unique features of Scowles- natural cave networks which have been quarried for iron and have then collapsed, resulting in a winding network of mossy rock pillars and gloriously gnarled trees. I have long wanted to do a Puzzlewood board for gaming. The necessarily long and narrow nature of the display I felt would lend itself to this kind of deep forest scene.
The first step was to see what space I was actually working with. There were two main considerations- 1: That it would have to sit between the base unit and tabletop unit without reducing the stability of either. 2: That it would need to be able to be packed safely in the car alongside the rest of the stand elements. The former consideration lead to the interesting angled front which would match with the bend in both existing units. The latter consideration restricts the box to 300mm deep and 800mm wide. To fit perfectly it would be 100mm high, but I judged this would be just too cramped so increased it to 150mm high. The extra height will just mean I have to be a bit more careful when loading/unloading it.
Having built the box I cut some strips of foam to start building up the terrain with. This would principally be a display for miniatures so I wanted to have staggered layers allowing figures to be placed behind others but still be seen. The 'pinch point' of the box would be a natural focal point so I wanted this to have a particular terrain feature in it, choosing a small forest waterfall as a naturally dividing element.
I based the foam on a sheet of HIPS (plasticard) so I could lift it in and out of the box whilst working on the scene. This would also provide a nice, smooth surface for me to paint the water on to.


The foam was carved with a wire brush, rasp, sandpaper and hot wire cutter in a combination of the methods I covered in my
video on sculpting rock. Once shaped I covered the terrain in a mixture of Jesmonite (the dark areas) and coloured filler (the grey areas). Jesmonite is great for producing really hard-wearing surfaces and I really ought to use it more in my scenery building. As it is this is the first time I have used it on something smaller than a full-scale stage set.
Time to twist more trees! I didn't want the scene to become too crowded so went for four large trees and nine smaller ones. These had relatively few branches each as most of the foliage would be directly mounted to the lid of the box, only the lower branches needed to be on display, creating the illusion the trees project up higher than the visible scene. I followed the technique for making trees shown in the
videos I made last year.
I punched holes into the base board where the trees would sit and glued them in place with PVA and a dab of filler. The location of the trees was chosen to 'frame' vignettes within the scenery. I shaped them initially before fixing them in position but finalised the position of the branches once in place to lead the eye through the scene from one group of miniatures to the next.

As you can see there's not much room for canopy with the lid on!
The trees were painted with PVA to provide a good base for the filler to grip to.
I usually turn my trees upside down whilst the glue/filler is drying so that any drips turn into upward-pointing stubby branches. It looks more tree-ish than lots of drips!

I made a thick mix of readymix filler and PVA with a dab of sawdust for extra texture. Adding a bit of green paint so that any bits missed by paint and flock later on (or knocks and chips from moving around) wouldn't show bright white.
Differing from my usual process I did not turn the fillered trees upside down to dry as I wanted some 'slumping' and dripping to give them a downward sag and increase the claustrophobic feel of the scene.

I also used the filler to set and assortment of stones as 'boulders' in the scene and to demark the edge of the channel where the water would run.
Looks glow-in-the-dark!
When dry I gave the whole scene a blast with various browns and greens using an airbrush. I wanted a general mossy, damp feel to the terrain, most of which would be covered with scatter materials later on. Whilst waiting for it to dry I painted the back of the box with gesso, brushing some green paint into it to create a streaky background suggestive of further greenery with light filtering through it. Again, much of this would be covered by foliage.
The heart of the waterfall is a piece of twisted clear plastic bag, taped to the base at one end then stretched up and taped across the rear of the foam. This took several attempts to get right! It needed to hang absolutely vertical and not slump to give the impression the water was pouring over. I washed some superglue over the bottom end to try and keep it fixed firmly in place then painted in a mix of greens as a base for the splash pool.
When dry I mixed up some regular clear 2-part epoxy glue, added a hint of epoxy resin pigment (green) and used a few stirring sticks to coax it flat across the splash pool and along the plastic bag. I think in hindsight I should have used un-pigmented resin for the fall itself, the 'trickle' has turned into a rather too vigorous pour which also looks more like slime than water. However, unfortunately, removing it again would have been almost impossible without taking the terrain apart and reconstructing it. For the turbulence at the base of the fall I used a few pieces of this fake snow medium dabbed into the epoxy when it was almost dry. This fake snow looks like torn up bit of packing foam so you could probably make your own very easily.
Going back to the box I put the same 'Victorian Mahogany' stain on as the rest of my display stands. If I were starting everything again I think I would choose a different stain colour, but in this case the red hue at least works nicely with the green palette of the scene. I laser cut and bent a piece of acrylic to sit on the front and protect the display from being poked by inquisitive fingers.

My usual go-to ground cover for terrain and bases is a mix of coffee, black tea and green tea, however in this case one of my work colleagues had presented me with some chippings from some Sapele he had been turning and I thought they would work great as a loamy, twig-strewn forest floor. It's definitely going to get added into my basing mix for future! I popped a couple of cheap Chinese model trees around the edge to provide a bit of a curtain of greenery and used some Javis clump foliage to locate large bushes and break up the expanse of ground. At this point I also drew onto the lid of the box where the major trees were located so that I could snake some LED strip lights around the areas where the foliage would break up. This will hopefully give the effect of sunlight penetrating the canopy, help the miniatures further back in the scene be visible and also attract the eye of a passer-by. Especially in the relative gloom of the Excel centre I am a big fan of illuminating miniature displays to help catch the eye.
Now it was time to get to work with the detailing. I collected together a selection of scenic materials for the task, I find it's always best to have as much variety as you can on scenery to avoid a 'uniform' and unnatural look. In this case I had sponge scatter and static grass from Model Tree Shop,clump foliage from Javis, brown/beige lichen, dried herbs, chunks of two different old plastic Christmas trees and a couple of classic model railway trees, maybe Noch?
Here much of the scenic material has been applied- much moss on the rocks, bushes made from clump foliage, ferny-type plants made from individual needles of plastic Christmas tree and twiggy plants made by cutting tufts of the model railway trees. I've tried wherever possible to put darker material into recesses and sprinkle lighter material on to force highlights, but the lighting will have its own impact on the form. Clump foliage has been sparsely applied to some of the lower branches but much of the tree cover has been glued to the underside of the lid, you can just see it poking up behind the box. Because the viewer is going to be on a level with or slightly above the box it's not necessary to cover the entirety of the lid with foliage. Instead I have spread clump foliage out in front and behind the row of LEDs then teased it into position to hide the light strip but simulate clumps of leaves. The light should look as if it is shining through dense foliage.
Once everything was in places I diluted PVA with water and a dash of washing up liquid and dabbed it all over the scene to soak into the scatter and fix everything firmly in place. Whilst this was wet I sprinkled dried herbs liberally over the scene to simulate less decomposed leaf litter.
The last stage was to add signage to either side of the display. It's all well and good for it to look pretty but ultimately it needs to be getting me sales too!
Here's the box in place in my extremely dim dining room as I try to sort out my stand layout. It fits nicely between the lower and upper units and is nice and stable which I am glad of, I wouldn't have wanted to go to all the trouble only to have it make the stand likely to fall on prospective customers! Now I need to check over the electrics on the rest of the stand, clean it up a bit, change some of the labelling and make sure I have enough stock... it's a long process getting ready for a show!
And here's an attempt to get the entire box (with example miniatures) into one shot...
Thanks for looking!

The Salute 2021 display box


