blog header

blog header

Friday, 21 June 2024

Search for Las Maisontaal- building the village

 
I've almost got the structures of all the buildings for the village done now. This is the second time of building for them as I did the Townscapes project several years back, but those I put my own spin on, these I wanted to try and get closer to (I expect) Dave Andrews' builds as shown in the pictures. In fact, could this be Dave Andrews' own table? Anyone know how to reach him and ask?


This picture gives the fullest view of the village which is spread out along the curving road. It's the only shot that shows the watchtower and farmhouse lurking in back there. There's also a sneaky little building popping out behind the half-timbered house. Going by the Townscapes origin of the other buildings I suspect this is Fritzy's kennel.


The farmhouse is only shown from the back in the photo and isn't too clear so I took a few liberties scribing stones into the bottom section and herringbone brick on the top. I think when painted the dark/light areas should make it close to the photo. For some reason the panels in the left wing of the house are squarer/wider than they look in the book photo despite the overall house measurements being taken from the actual Townscapes building. It's probably the extra 6mm generated by cladding in Depron foam, strange how a small change makes so much difference working this small.


The watchtower I pretty much made the same as the last one I did. I could probably just have used that but I felt like having another go. This one has the same style roof as the other buildings in this batch (laser cut ivory card tiles with vectors taken from the actual Townscapes roofs) rather than the cast resin shingles I put on the previous one.


The half-timbered house can be seen in both photos, but only from this kind of angle, and largely obscured by hedge. They obviously don't want their neighbours seeing what's going on within. 


Here's Fritzy's kennel, ready to hang out mysteriously behind the back corner of the house. It's quite large, Fritzy must be a biiiiiig dog!


The cottage we have two clear views of, in the black and white picture and the full colour spread. The Townscapes building has a lean-to on one side but it's not clear from either picture if the one on this board does. I suspect looking closely that it does, some kind of ridgeline can be seen projecting from the far side, but I opted to do the house without. Some of the exposed brick visible on the Townscapes card model is in evidence on the front view so I have kept it on the back. I've put a couple of windows on the hidden side of the building to give the poor inhabitants a bit more light... and a nice view of the hordes come to loot and pillage!


The barn can be seen in all three of the photos of this side of the board. It's a pretty simple structure but fun to make. There's clearly some kind of poster on the wall on the river side which I will have to make some decisions about.


Making the front timbers really weathered with a steel brush and my spiky modelling tool was a lot of fun. 


The above photo also gives the clearest view of the privy. I'm pretty certain that the one in the photo is actually the card Townscapes one, not a nicely built version of it. Nevertheless I thought I'd make a nice one out of coffee stirrers anyway.


There are pretty good shots of the mill in these photos too, perched atop the stream. It doesn't show evidence of the wheel (I guess there's a small one inside then?) and preserves the door in a strange position right on the edge of the water. Logically if the wheel is (far too small and) in that archway then the grinding stones are positioned in the right wing and the grain store is presumably the upper floor of the big timbered barn part. I've put some bigger doors on the parts of the building you can't see in the book photos as it makes far more sense for cartloads of grain to be delivered from this side. I've also changed where the openings for winching sacks are on the building as where they are on the card model doesn't really make sense. The rear ramp is clearly not in evidence in the book photos so I haven't built it. Not really needed given the surrounding terrain. 


Share/Bookmark

Wednesday, 12 June 2024

Search for La Maisontaal- bridge and board


Remember that bridge? Well, it IS that bridge! Hoorah, we were looking at the other side of it. The elderly vacuum form plastic was quite brittle so I have epoxied the cracks and infilled with dental plaster. Now mounted on MDF boards it should be durable enough to march a regiment of orcs over.


All our students have gone home for the summer now, hooray! I can put one of the big workshop tables to use laying it all out. Time to make the boards then. Ordinarily I would use high density extruded foam for my modular terrain boards. It's stronger, carves better, holds sharp edges etc. etc. BUT I wanted to be a bit more authentic and I suspect that the original board would have been standard 1" polystyrene ceiling tiles so I bought cheap expanded polystyrene tiles to use. The postage was as much as the tiles themselves and I think all in they cost under £25 which for an 8x4 base board is bargain. Fortunately there's not much (apart from the river, nothing in fact) surface undulation, they might just as well have been flat wooden tiles! They're actually a tad smaller than 2' square but that 5mm doesn't make a whole lot of difference. Because they are very brittle I have mounted them on some 9mm MDF. Also means I have a nice smooth surface to paint my river onto. The tiles were too big to put through a bandsaw or hotwire cutter so I hacked them with a stanley knife. Nice rough, rocky riverbank edges.


I've covered the polystyrene in two layers of a diluted PVA/Filite mix. Filite is an additive powder usually used in fibreglass and plaster casting applications. Mixed with the PVA (wear a mask, use extraction etc.) it's a poor man's Jesmonite and forms a nice hard shell over the foam, protecting it from dents and knocks. After that was dry I gave the top of each tile a smooth coat of PVA and dumped sand on top until the wet patches where the glue is soaking into the grains stopped coming through. When it was completely dry I tipped off the excess and gave the tile a spray with Isopropyl alcohol (smelly, wear a mask, ventilate etc.) then soaked it with very diluted PVA, about 75% water. Then I sprinkled a bunch more sand on top and again left it to dry overnight. The top surfaces are now rock hard and have a suitable base texture (and colour actually) to work onto. But, the bridge is looking lonely, let's see if we can do something about that.


Some years back I converted all the Townscapes buildings into files for laser cutting, so it was a quick and easy job to find the bits I needed for this layout. They're all Dave Andrews (I presume) models either using the Townscapes buildings as templates or possibly prototypes that the eventual card buildings were based on. There's the mill, cottage, farmhouse, watch tower, barn, half timbered house and loo. 


The pictures of the village part of the build are grainy and difficult to see clearly, but should give me enough information to do the balsa wood framing etc. If anyone knows of pictures of these exact buildings turning up in other publications at the time do let me know! I actually already have all of these buildings made up, but as I did them without reference to these pictures I'm going to do them again getting as close as I can.


I've also cut myself a bunch of bases for the hedgerows, fences etc. Many of these are coconut/coir fibre hedgerows but there are some fences in there as well which Mike thinks are Merit. I've guestimated the size of the hedges etc. from the bases of units around them and I think they look pretty close. 120mmx20mm with angled ends to bend around curves. I've now used this placement to mark in the road for painting.


 Beginning to start looking like something!


Share/Bookmark

Monday, 3 June 2024

Cult of the Leering Lune... where the hell are we up to now?


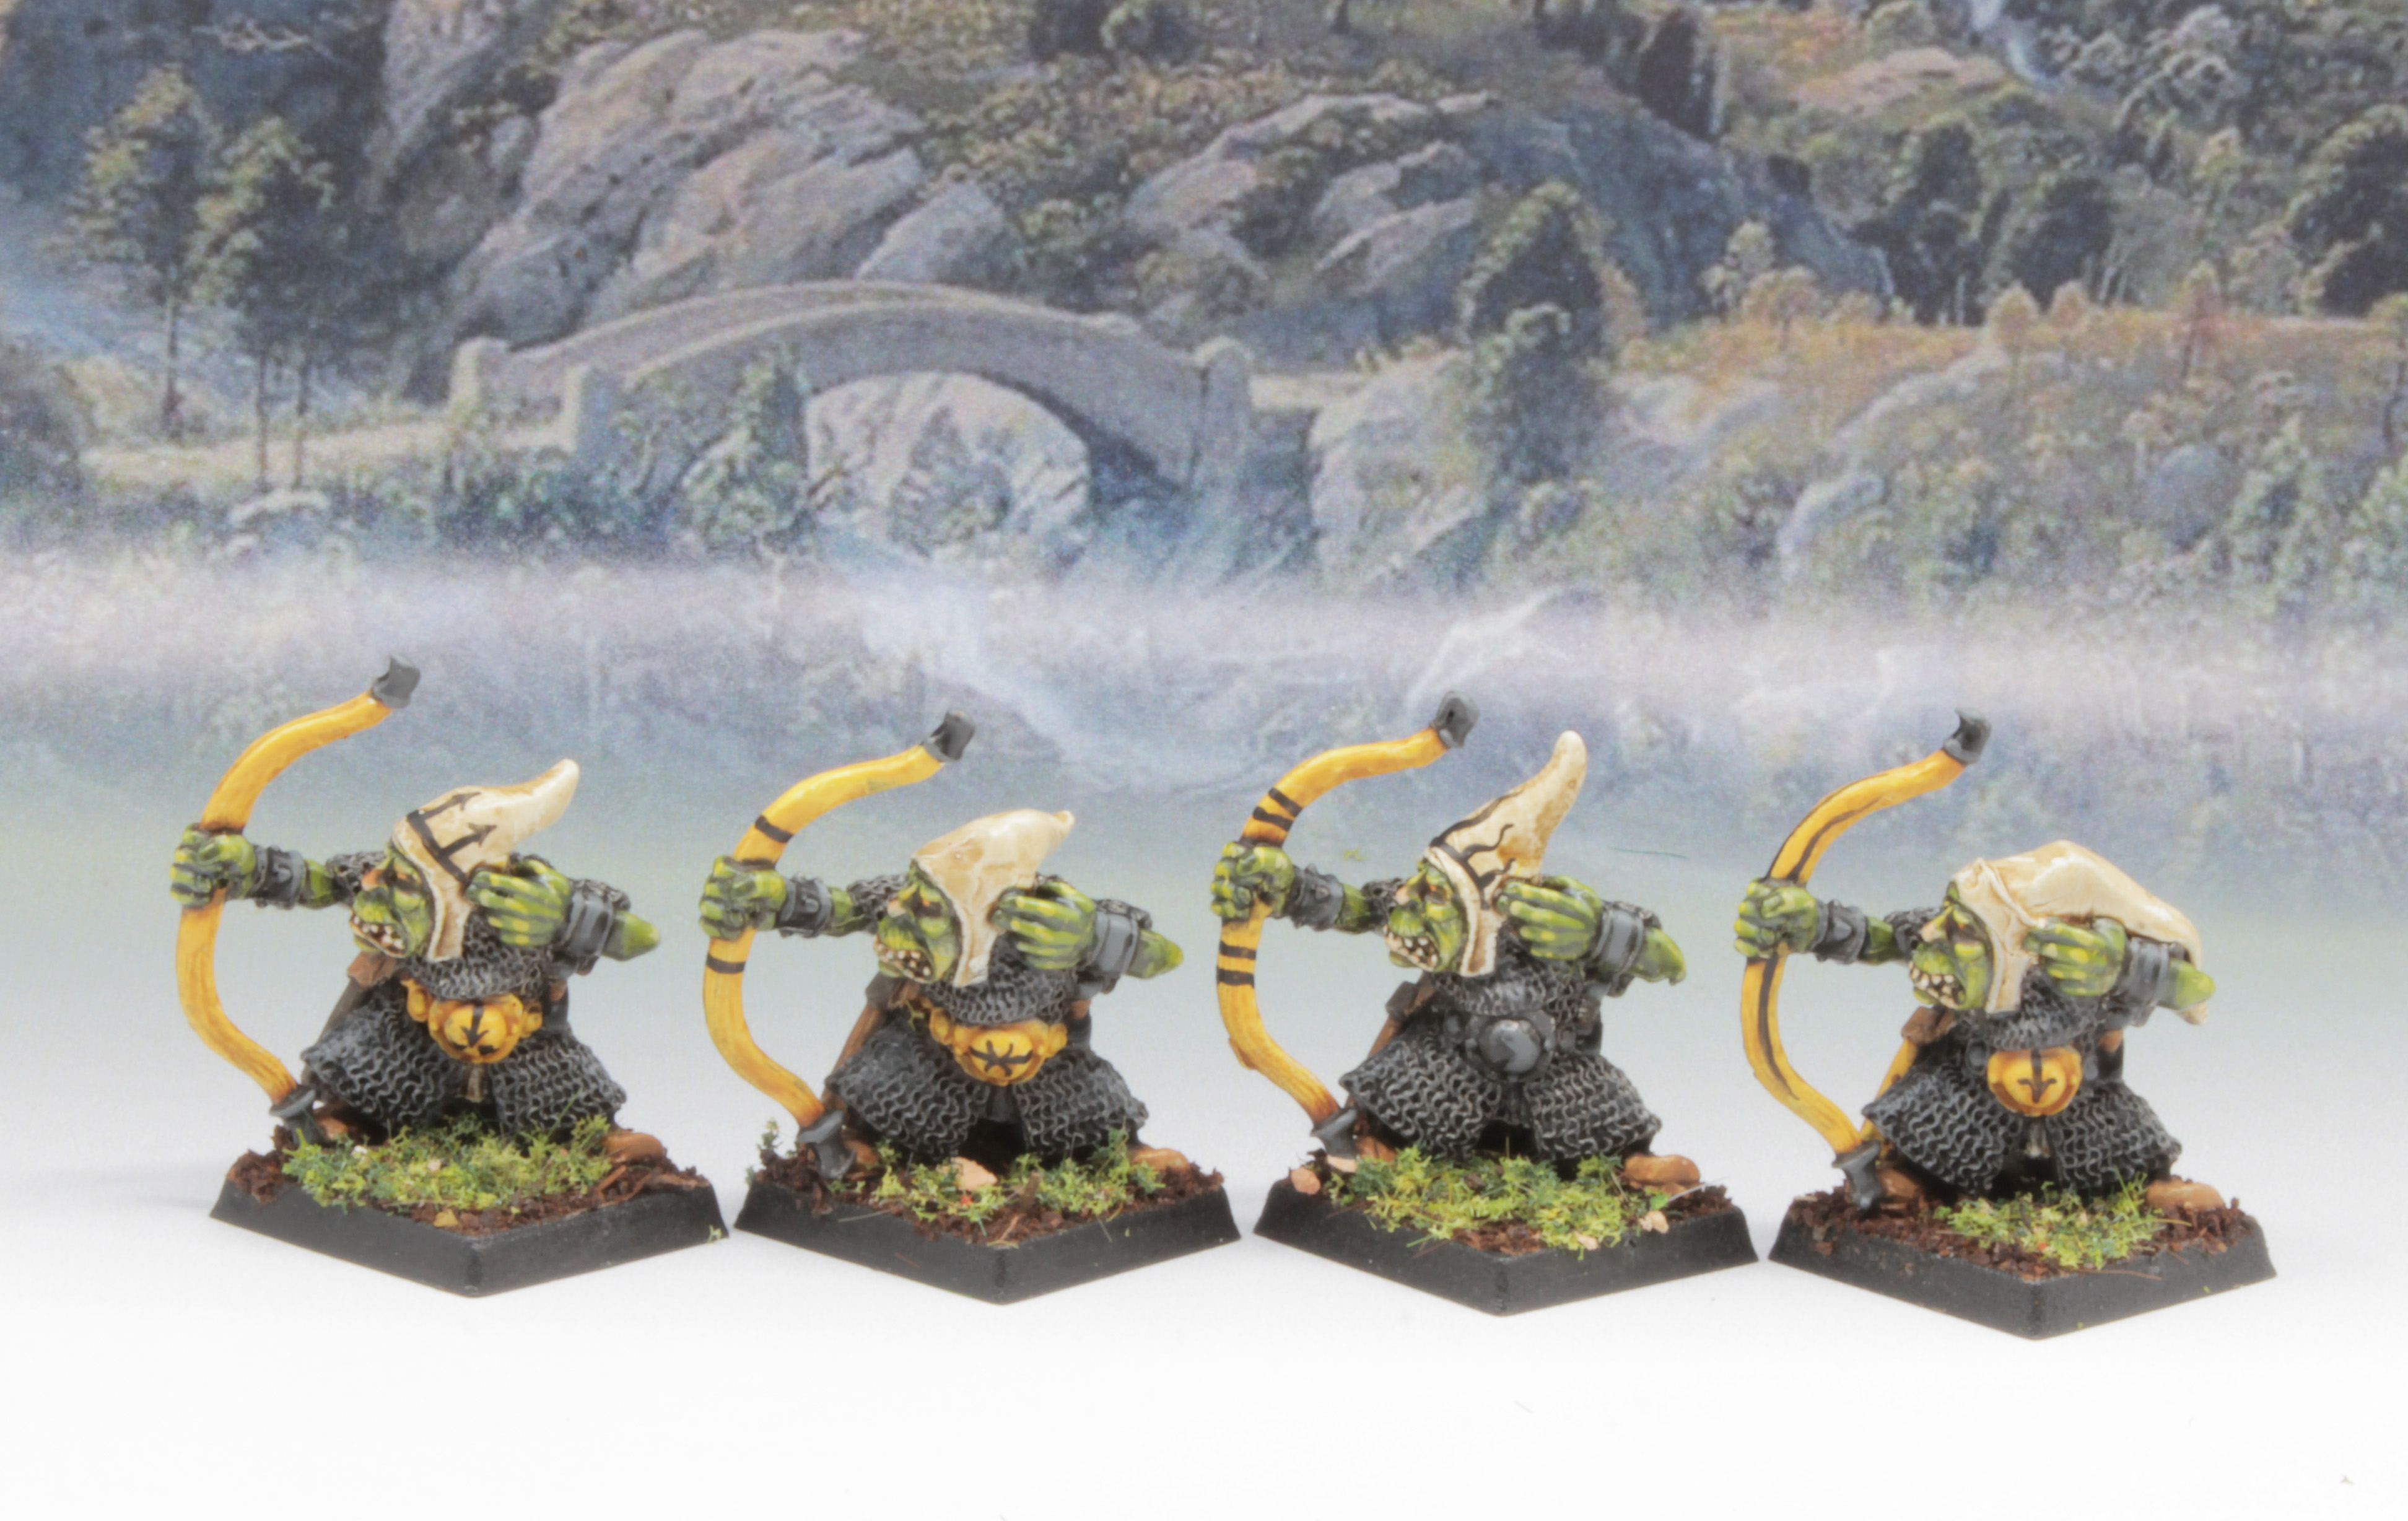
Yes, it's gobling time again folks. It's been such a horrible, all-consuming couple of months I have completely lost track of where we are, but I believe there are two months left of the Tale of 4th Gamers challenge and I have about a hundred gobbos left to paint, so the end is in sight. I did just about manage to pull of these chaps without straying too far into June.


The leader of this unit is from the recent Old School Miniatures Kickstarter, making him one of the newest Kev Adams goblins in the long line. More on those later. Next to him is a Nightling archer, making up even numbers in the unit.


The rest of these guys are Harlequin/BTD goblin soldiers. I got a job lot of ten from a popular online auction site almost exactly a year ago, so it's very satisfying they are finished just under that marker. I removed their roman-esque crests and puttied on some simple hoods to make them look a bit more Night Gobliny, but of course they are wearing a lot of chainmail which apparently Night Goblins aren't allowed so these will be Common Goblin archers standing in solidarity with their nighty cousins.


I'm sticking with brightly coloured bows, each unit being marked out by a different colour. These guys are the Black Arrow Brigade, as shown by the recurring motif, otherwise known as the Black an' Yellers... for yes, they do indeed have a yellow streak.


The last unit of bows are also heavily-armoured Common Goblins and also (mostly) from the Old School Miniatures Kickstarter.

The set consists of a few variations on a few poses with largely just different heads. Mostly good casts although the tankard and top of the bow on the left most chap here didn't cast properly. I gather these guys were bigger than the commissioner had intended, that seems to be par for the course for both Kev and Old School Miniatures! However the Goblinmaster has had some eye surgery and I believe is now confident he can do some smaller gobbos again in the future.


Some older, smaller goblins have also crept into the unit.


 And finally for this batch we have yet another shaman. I really must learn how magic works in 4th edition! He may not be that pleased at being demoted from goblin king, but he still has his impressive flail to take out his frustrations on the enemy. His familiar has either a selection of scrolls his master may someday read or some edicts that he may someday sign. Assuming he can read and write...


Share/Bookmark

Tuesday, 28 May 2024

Search for La Maisontaal- a bridge too far?


I expect I was not the first kid to have opened the 'big orange book' and been completely bowled over by this picture. Since the very early days of my interest in fantasy wargames this has been 'THE' table to aspire to. It appears in a few pictures in the 3rd edition rulebook, but not as many as my memory insists, and nowhere else to my knowledge. There's a strong possibility it wasn't even a Studio table as nobody seems to remember it (and I would have thought you would if you had played on it!). Of course, teenaged me was unable to identify a lot of elements on the table and didn't have the skills to get anywhere near. The best we managed was to cover my mate's bedroom carpet in earth and dried moss after deciding to just go into the woods, grab handfuls and stick it to a chipboard base with PVA glue.

Some 6 (?) years back Oldhammer Community member Justin Coutange began making his own recreation of this epic piece. Sadly Justin lost the battle with cancer before he was able to get the project completed but it was such a great experience watching his progress since it was also something I had long wanted to try. This year marks my 40th year on earth and I plan to host a big weekend battle to mark the occasion. The main hosts will be my Empire and Undead armies, the Undead, of course, based around Heinrich Kemler's victory at La Maisontaal- which just happens to be sat in the corner of this table. What better excuse to have a crack at it? I'll need something to do once I've finished painting my Night Gobbos...


There are many pieces on here recognisable to my now-experienced GW collector eye, Townscapes buildings (or better crafted versions of) and La Maisontaal from the Journal, but there are a few non-GW elements I needed some help identifying. Enter Mike from Broadswords and Beasts, an expert in dissecting old photos and finding the miniatures and scenery lurking in the graininess... These shots are actually pretty decent compared to a lot of the magazine images he has successfully recreated! He was able to identify the trees as Britains Floral Garden Oaks and thought the bridge might be Bellona, a company that did vacuum-formed terrain in the 70s and 80s. He had a couple of their bridges but after comparing the shots they weren't quite right. Now I am totally OK with scratch-building this bridge, it's not that complicated, but if an existing piece is obtainable well that just makes it more authentic, right?


Doing some Google digging I was able to locate a Bellona catalogue showing three bridges. U-RV1 top left and U-RV3 top right I believe are the two bridges Mike had, one with buttresses and the other too stubby. The one in between, U-RV2, however, looks perfect. I was completely unable to find any photos online of this bridge, but Mike but the word out through some of his vintage toy and wargames networks and found a chap who had one. Here it is (below, shown with a couple of U-RV9 'Bridge in Ruins'es)


This very example should be with us shortly, and even if it isn't exactly right it look close enough to my eye, especially as it can be easily adjusted and painted. It will probably need a bit of reinforcement anyway as 40-year-old HIPS isn't particularly robust. It's interesting outlining the stonework as, starting from the distinctive L-shaped block, much of it seems to correspond, albeit a bit distorted. There are some blocks, however, that look shifted, stretched, or just completely different. It's always possible that is down to the painting (since vac form necessitates low relief and joins can be added or removed without standing out) or addition of filler where the bridge has been sunk into the bank, but I think there's another more possible explanation... we might be looking at the other side of the bridge! Time will tell when it arrives.  


Share/Bookmark

Fimm McCool's

Fimm McCool's